Thursday, December 5, 2013

Upcycled Christmas Card Bell Ornament

 
Do you keep your Christmas cards every year and don't know what to do with them?

Turn them into Christmas Bells
with these easy-to-follow instructions.

Supplies:
Christmas Cards
Glue Stick
Glue Dots or Hot Glue Gun
Fishing Wire or Ribbon of Choice
Scissors
and small jingle bells (if you want them to ring like a bell!)
Open the card and cut off the back,
along the fold.
Cut the cover into a square
by folding the bottom or top edge
over (diagonally) to line up with the side edge.
Cut off and discard excess.
Now you should have a perfect square!
You should already have the card folded into one triangle...
make sure that the "colored" side of the card is always on the outside.
Note:  with each fold you make,
crease it really well.
Now open the card,
and fold it the other way,
into a triangle...
Open the card,
it should look like this.
Now fold it in half  "hot dog" style...
(it's called hot dog - because it is folded like a hot dog bun,
in case you were wondering!)
Open it again,
now fold it the other way, "hotdog" style.
Upon opening the square card now....
it should look like this...

The next step requires 8 folds...
but to break it down simply, just focus on each of the four corners.
Fold a flat edge UP to reach the center diagonal line,
as shown.
Now do the other side,
forming a point at the CORNER.
The card will be folded into the shape of a kite...
Now open it up,
and do the same thing with the next corner...
Until all 4 corners are folded...
Unfold the card,
it should look like this.
Now for the magic....
Start forming your Bell
by pushing in the middle edges as shown above...
Squeeze and shape the bell together...
the middle of the card will be the bottom.
Now is the time to cut and tie your fishing wire
or ribbon into a loop for hanging your bell.
Attach the tied knot to a glue dot (or a dot of hot glue)
and attach it to a top fold of the inner bell
as shown.
Apply the glue stick to the edges of the folds
where they meet together...
be sure to get the glue ALL the way to the edges.
If you want to drop in a small JINGLE BELL,
now is the time!
Now, form together the bell
and hold it together until it sticks
it takes a little while...
(sing a Christmas song all the way through -
that should be long enough!)
This is what the bottom looks like...
Look what you did!  From a flat card,
to a bell!
Hang on your Christmas Tree,
or give to a friend!
Here's a bell I made several years ago...
Do you see THREE bells?
and THREE more here!
Just think of HOW MANY you can make!
Have fun!
 
Keep Calm and Kerri On!

Thursday, November 28, 2013

Tips for a DIY Holiday Table and Place Settings on a Budget

Here's a picture of our table for Thanksgiving this year.
I chose to work with the colors silver, white and green.
I used dishes I already had.
A set of white china with silver edges that I purchased at a yard sale
and my Grandmother's Depression Glass.
I mixed and matched these.
Tip:  Throughout the years, collect dishes
that you can use for many occasions,
a great choice is white.
Also - anything that is passed down from a loved one,
can be worked in to many themes
and brings a meaning to your meal.
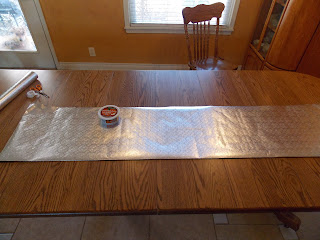
For a table runner,
I used silver wrapping paper.
Tip:  Purchase a coordinating wrapping paper for your theme.
Cut it half the length wanted,
cut in half the long way - by folding it first,
now, fold under the edges and tape the two lengths together...
top with your table centerpieces.
I wanted candles at the table,
but didn't have any coordinating candlesticks
so I bought some bright green Granny Smith Apples,
cored them....
and scooped out the centers,
inserting some candle tapers I found for 75 cents at a yard sale.
Insert the candles.
To make the candles more stable
(we had little ones running around)
we settled the apples in Epsom salts nestled in silver and green bowls.
You could also use, rice, beans, sand, coffee beans, etc.
For the napkins,
I simply tied them with twine
and inserted a rosemary twig in each,
from the garden.
Tip:  Consider purchasing plain white paper napkins,
or color coordinated from a dollar store or party supplier.
If you don't have napkin rings, consider
tying with twine, yarn or ribbon.
You can insert fresh herbs, leaves or leave unadorned.
Mix and Match:
bottom - Grandmother's Depression Glass Plate,
topped with a White China Salad Plate,
Paper Napkin wrapped with twine and Rosemary.
At the next seat,
I switched the plates,
starting with the china on the bottom.
Tip:  You can always use plastic cutlery.
If you have a few extra dollars, try going to Goodwill,
or a second hand store and purchasing mismatched cutlery,
the look can be very eclectic and cool.
I fell in love with the above pattern "Treble Clef"
at a bed and breakfast.
When I could afford it, we purchased two sets.
Remember: buy what you love.
I continued to set the table...
green apples and silver balls in a glass bowl makes a nice focal point,
as well as silver pieces I've picked up at sales,
like creamers, sugar bowls and a butter dish
(yes - I put the butter in there!)
Tip:  Search your house for items that might
match your theme and colors,
you never know what you might have forgotten.
We inherited my mother-in-laws table
with many leaves,
we are very fortunate...
Tip:  Use multiple tables if needed,
just decorate them with a cohesive theme...
We mismatched the chairs.
 
NOW, for last Christmas,
these are pictures of the same table and dishes,
but notice how different the table looks
by using different colors and items:
Again, I used a gift wrap table runner,
but this time in HOT PINK.
Instead of napkins in rings,
I topped each plate with a "name tagged ornament"
Instead of using my cutlery,
I bought plastic and used plastic drinking cups as well.
 
Thank you for visiting my blog,
hope you all have a wonderful Holiday Season!
 
Keep Calm and Kerri On!


Monday, November 25, 2013

Double Snowman Gift for Co-Workers

Another Pinterest Craft:
Snowmen made out of Microwave Popcorn or Hot Cocoa Packets
and a Pair of Winter Gloves!
 
Above is a Popcorn Snowman....
Here's a stout little guy made from Hot Cocoa Packets.
Gather your materials:
Microwave Popcorn Packages
and/or single Cocoa Packets
Pairs of Winter Gloves
White Computer Paper
Christmas Ribbon
Scissors
Tape
Markers and/or Colored Pencils
Fold and wrap the paper around the packets of popcorn or cocoa,
taping securely...
Each pair of gloves should be "connected" together,
probably by a little plastic hook - leave that in place.
Stretch one of the gloves wrist cuffs over the top of the wrapped package
as shown.
 
Tie a ribbon around the pair of gloves to make a hat.
Now draw and color on your snowman's facial features.
Give a little cheer to your co-workers,
friends, kids, or even a stranger!
 
Let it Snow...Let it Snow... Let it Snow!
 
Keep Calm and Kerri On!