Sunday, March 31, 2013

Front Garden Re-Do


Our family project for the last two weekends:
Rebuilding a corner garden next to our porch.

I didn't take a before picture - (above is the "after")
 but the corner garden existed with railway ties, in three tiers,
 very similar as shown above.
But the wood started to deteriorate and so it needed to be torn down
and built back up with sturdier materials.
Step 1:  Draw out a plan - I drew out a rough idea of what we wanted.
Step 2:  get a crew together:  husband, Gary; son Sam and son Ethan
(I'm the supervisor and photographer!)
Step 3: Gary, Sam and Ethan (not pictured)
tore down the old garden
and shoveled the soil onto the driveway.
Step 4: Gary laid down a cloth barrier to prevent weeds from growing up.
Step 5:  Ethan and Gary lay out the foundation brick work.
We knew we wanted red garden brick,
but knowing the foundation will not be seen,
we used cinder blocks to save some Moo-Lah.
Oops!  Don't need that front layer, it will be seen.  We took that off.
 
Step 6:  Lay in the decorative brick.
The cinder blocks gave us height and a ground work for the decorative brick.
Ethan suggested "gluing" the bricks down to keep them from falling.
This was done with a concrete adhesive. 
We let that sit and dry a full 24 hours before filling in with soil.
Step 7:  Fill in with soil and compost
 starting on the top tier and working down.


Step 8:  My husband and I have always collected rocks, large and small from different areas we've visited, so we thought a rock garden would be appropriate.  The large rocks were placed in the garden before any plants.  Some rocks even had holes that could house a plant inside.

Step 9:  Planting time!
I have an enormous amount of mums,
so I separated several clumps and planted them
towards the back of the bottom two tiers.
Then filled in with more draught tolerant plants like
 sedum, dianthus, and decorative grass.
Step 10:  Hmmmm...maybe we should put down more
barrier cloth to prevent unwanted weeds as well as keep the rocks from sinking into the soil?
Yep....I think so. 
 So we cut the cloth to fit around the plants, and simply placed the large rocks on top.
Step 11:
Now we decided to fill in with white garden rock.  (actually there are tan and grey rocks too!)
Only $3.98 per 25lb. bag at Lowe's!
The top tier houses a nice decorative grass that will grow up to 2 feet tall.
You simply cut it back in the fall and it will grow back.
Love the sedums!

I even placed one of my garden totems in the rock garden!
(see my previous post on how to make your own garden totem pole).
And here is the finished product!

Now to start on the garden above and to the left!
Hmmm....thinking Purple Wave Petunias and Sweet Potato Vine?

Thank you for reading!
Hope you have fun getting your gardens ready for Spring 2013!
Remember to "Keep Calm and Kerri On"!

Friday, March 22, 2013

Kerri's Favorite Things: Brush Guards

Have you used BrushGuard on your makeup brushes?
I found out about brush guard through the monthly subscription Birchbox.

What do they do?
The brush guards protect your makeup brushes (or art brushes).
You insert the brush (bottom first) and slide it up over the bristles.
I love the design of these brush guards.  They expand, yet conform back to the original shape.
When do you use them? 
Whenever you pack your brushes on the go.
When you wash your brushes....the guards protect the bristles as they dry.
Where can you find them?
At your local Wal-mart of other department/drug stores.
Retail Price:  Around $5 per packet of six guards.

Tuesday, March 19, 2013

Salad in a Ball (Jar that Is)


My doctor says I need to eat more vegetables...(don't we all?)
I like eating salad, but hate making it.
So, yesterday I prepared seven salads in Ball jars, so all I have to do is open the fridge, and "wah-lah" a single serve salad is waiting to be devoured.
This took me about an hour from start to finish - well worth the time.
I found the following pin on pinterest and thought I would try it.

My family likes beans, nuts, meats and cheeses.
So I gathered:
Black Beans
Garbanzo Beans
Dark Red Kidney Beans
Raisins
Pecans
Walnuts
Sunflower Seeds
Reduced Fat Shredded Sharp Cheddar Cheese
Turkey Deli Meat
Shredded Carrots
Mixed Greens including Baby Spinach
and Cucumbers (not pictured)
I gathered our favorite dressings...
and bought me some Blue Cheese Chunks (I'm the only one that likes them).
Then I started "LAYERING" our salads
in Ball "Pint and a Half" jars.
As the Pin states, layer your jars:
1.  Dressing on the bottom
(this is IMPORTANT - keeps the salad fresh if the dressing is at the bottom)
2.  Hearty Bits next (beans, cucumber, carrots, etc.)
3.  Lighter Bits (seeds, nuts, mandarin oranges, tomatoes)
4.  Spinach, Arugula and Mixed Greens
Seal in a jar.
I made several different salads for my family:
RASPBERRY, BLUE CHEESE, WALNUT: (my favorite!): Raspberry dressing, red beans, carrots, cucumbers, blue cheese crumbles, raisins, walnuts and spinach.
TACO RANCH: Ranch Dressing, Picante Sauce, black beans, turkey, sunflower seeds, carrots, cucumbers, shredded cheese and mixed greens.
HONEY MUSTARD TURKEY: Honey Mustard dressing, carrots, cucumbers, garbanzo beans, red beans, turkey, sunflower seeds, raisins, shredded cheese and mixed greens.
RANCH NO MEAT: Ranch Dressing, cucumbers, carrots, cheese, garbanzo beans, red beans, pecans and mixed greens.
KEEP REFRIGERATED
USE THESE SALADS WITHIN A WEEK - no problem at my house!
To Serve:  I recommend dumping just the lettuce onto a plate...
Then shake up the remaining ingredients and dump on top.
That's it!
Yum!  Very fresh and tasty!  Enjoy!
Try adding your favorite ingredients to create "ready-to-eat" Salad in a Jar for your family.
Other ideas:  hard-boiled eggs, tomatoes, celery, radishes, beets, strawberries, orange slices, ham, roast beef - the possibilities are almost endless!
Keep Calm and Kerri On!

Monday, March 18, 2013

Free Birthday Stuff!


It's my birthday!  Check out all of the FREE stuff I scored!
Would you like free stuff on your birthday?  Who wouldn't!
Simply search on line:
"your city" free birthday stuff
 
It should bring up a list of freebies in your area.
I would suggest doing this at least a few months before your birthday.
 
Simply decide which freebies you want to register for and follow the guidelines to enter.
Usually this requires pulling up the individual company's website and becoming a member.
You can also watch my youtube video:  "How to get free Birthday stuff!" at:

 
Below is a list of what I received "on" and "around" my birthday.
STARBUCKS
This does require you to have a registered Starbucks Gift Card.
Your FREE birthday gift:  Any drink, your choice, any size.
RED ROBIN
Register on-line for rewards.
A FREE birthday burger & fries!
SEPHORA
Each year they give their Beauty Insider members a birthday gift,
absolutely FREE!
No purchase necessary.
For 2013, it is a gift duo by Benefit.
Their "Real Mascara"
"Watt's Up" Highlighter
SONIC
Become a member of their website and enjoy frequent specials through your e-mail.
Your FREE birthday gift:
your choice of a medium drink, tator tots or cream slush.
PAPA MURPHY'S
Free Chocolate Chip Cookie Dough
with the purchase of any pizza.
They will send you an e-mail to print the coupon.

McALISTER'S DELI
Register on line and receive a coupon in your e-mail for
$5 off an entree.

It is very generous of all of the companies that offer free or discounted merchandise or food on your birthday.  Always leave an appropriate gratuity...
 (I always figure the tip according to the total of the order, before any discount is given.)


Thursday, March 14, 2013

Beauty Army March 2013

March Beauty Army has arrived
YOU CAN ALSO WATCH THIS ON youtube at:
Beauty Army is a beauty subscription for $12 each month.
YOU get to choose up to six samples each month from a selection of nine.
Don't like everything they're showing you?  NO PROBLEM!
Retake the beauty quiz to pull up a different sample selection!
Sometimes you even get full sized products!
 
Below are the items I chose:
(I placed the penny by each so you can picture the size of each product)
enspri
5-minute anti-aging facial treatment .106oz and .135 oz
The Olive Bar
Olive Natural Beauty Bar - Cleanser
Lemon and Lavender
(love the box!)
SKINN
Color Touch Eye, Cheek and Lip Glow
in "Teen Tone"
.134 oz.
FULL SIZED PRODUCT!
Yay!
NOT YOUR MOTHER'S
SHE'S A TEASE
Volumizing Hairspray
Infused with Apple Blossom & Bamboo
2 oz.
HOTHOUSE FLOWER
Fragrance Spray
1.5 ML/0.05 FL oz.
In a cute little box.
WHIP HAND
Beauty Army Camo Collection
in the color:  Medal of Honor
Beauty Army comes in a little sturdy box in pink, white or black.
Inside is a pretty pink camo print.
I reuse these boxes for storage for makeup or crafts.
YOU CAN ALSO WATCH THIS OPENING ON youtube:
 

Tuesday, March 12, 2013

Zentangle

ZENTANGLE MANDALA
 watch my video showing me draw this zentangle: http://youtu.be/MMtGn6uGVg8
The Zentangle® art form and method was created by Rick Roberts and Maria Thomas and is copyrighted. Zentangle® is a registered trademark of Zentangle, Inc. Learn more at zentangle.com.

This is the SAME zentangle above and below.
MANDALA:

  The word "mandala" is from the classical Indian language of Sanskrit. Loosely translated to mean "circle," a mandala is far more than a simple shape. It represents wholeness, and can be seen as a model for the organizational structure of life itself--a cosmic diagram that reminds us of our relation to the infinite, the world that extends both beyond and within our bodies and minds.


Monday, March 11, 2013

Mascara Review

I am reviewing my 4 most recent mascara brands.
Three of which I received in gift Subscription Boxes.
You can also watch my VIDEO REVIEW of the mascaras at:
1.  My FAVORITE MASCARA:  BLINC by Blinc - "STOP painting your lashes...TUBE them!"
Retails for $26.00 - I can only find this on-line.  Comes off with lots of water, by slightly pulling off of your lashes with your thumb and forefinger.  I love this mascara - stays on until you take it off!
Seems to make my lashes appear thicker and longer.  I will spend the extra money on this.  (originally I tried this through Birchbox Beauty Subscription)

2.  For a "BIG LASH" look - I like the CoverGirl LashBlastVolume Waterproof Mascara.  It has a large wand which grabs a lot of product, but goes on very well, no clumping for me.  Put on several coats for a "faux lash" look.  Retails for $7.79 available in drugstores.

3.  Mark "Hook-Up" Mascara by Mark (Avon).  This comes in a shorter tube, but you'll need to replace your mascara before you run out.  I really liked this mascara for a "natural" look.  The small wand nicely coats and separates your lashes.  Retails for $6.50 - through Avon - but can't find it in the book.  I know you can look it up "on-line". (I received this sample through a Beauty Army Subscription.

4.  Pop Lash Ka-pow! - I really had high hopes for this mascara sample I received in my Ipsy Bag, but was disappointed.  It seemed to smear within a few hours after applying.  Maybe they have a waterproof mascara?  That would be better for me.  Retails for $9.98.  Unfortunately, I will not be purchasing this particular mascara.

Again, you can see this review on video through youtube at:
 

Saturday, March 9, 2013

DIY Button Rings

Upcycle some buttons into fun rings.
YOU CAN ALSO WATCH MY YOU TUBE VIDEO
ON HOW TO MAKE THESE RINGS AT:
 
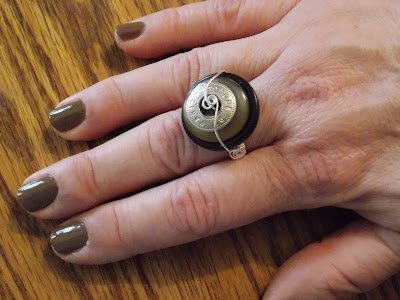
Above is a ring I made out of three buttons - the top one is a silver button from a jacket.
The ring above is made from two buttons and a silver bead.
See below for instructions.
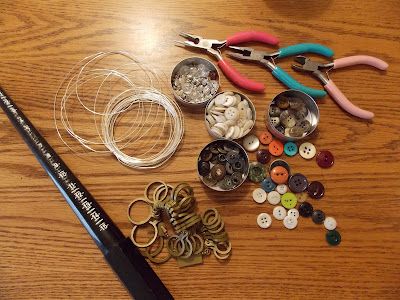
Supplies you will need:
A Ring Mandrel or magic marker (something that can be used to make the ring the correct size)
Ring sizers (optional)
Assorted Buttons (not shank buttons)
 (grandma's buttons or buttons from old clothes or find at a craft store)
22 gauge wire from the craft store (I  used silver non-tarnish)
Jewelry Pliers (cutters, flat nose, and round nose)
Pick two or three buttons for your ring...
stack them up - switch and swap
until you find a combo you like.
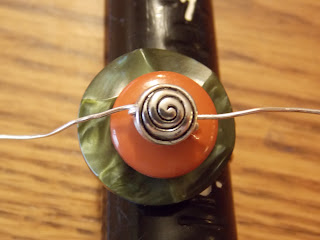
For this green and orange ring I added a bead for interest.
Measure your finger and check the size...remember you can choose "any" finger...
Don't have a mandrel?  Don't worry -
simply slide one of your rings onto various tubular objects like markers or chap sticks, until you find one that is the same size or slightly larger.
When using the mandrel - you will need to go UP a complete size.
If using a chap stick or marker for a mandrel -
just remember the ring will be smaller than the size of the tube.
Cut about 18" of wire....
find the center and wrap around the mandrel five times,
at the appropriate ring size (remember to add ONE full size)
twisting once to secure...see above picture...
Slip the buttons onto the two wire ends,
the largest one first, ending with the smallest.
(the wire will start to twist, but will straighten out as they get closer together)

If using a bead, slip both ends through the bead
and work down to join the buttons...

If you are NOT using a bead for the top,
and want to create a rosette or spiral on the top...

Simply twist one wire tightly around the center, followed by the other.
Separate the two ends to point out toward the outside of the ring...
Take the ring off the mandrel, and hold with your thumb inside the ring.
Wrap one side of the wire underneath the ring.
Be sure not to "pull" the wire too tight, as this will "offset" the top of the ring.
Wrap the wire five times around the band, creating a wrapped row.
 
Cut the ends to about 1/2 an inch...
Using the round nose pliers, curl a small circle at the end...

Grab the circle with the flat nosed pliers and continue to spiral.

At the end, "fold" up the wire to lay on top of the five little rows.
Squeeze the rosette and band together with the flat nosed pliers to secure.
REPEAT on the other side.
 

Have fun with this...and remember...
PRACTICE makes PERFECT
Don't get discourages if the first one doesn't come out right,
it took me several times.
These make great gifts!

Be sure to check out my video for making these button rings at:

http://www.youtube.com/watch?v=QyiZn_VSBx4

Keep Calm and Kerri On!