Thursday, March 2, 2017

DIY DOLLAR TREE FAUX SUCCULENT ARRANGEMENTS


EASY AND INEXENSIVE
DIY SUCCULENT ARRANGEMENTS

Total Cost: $8

Total Cost: $12

Most Dollar Tree Stores carry faux SUCCULENTS in the Spring.
Each individual succulents plant is only $1. I find they're very good quality.
Grab them while you can, as these plants go quickly!

I will demonstrate how I made the arrangement in the wooden bowl.
I made this to be temporary so we can reuse the bowl and plants for other arrangements


Supplies from The Dollar Tree:
 2 packs of styrofoam circles (each pack contains 2)
1 bag of rocks
succulents
(I chose 5 for this arrangement, yet you can choose more or less, depending on the size)
.
 Other Supplies:
container of your choice
craft scissors
E6000 or hot glue (optional)
aluminum foil (optional)
Marbles or other decorative small items


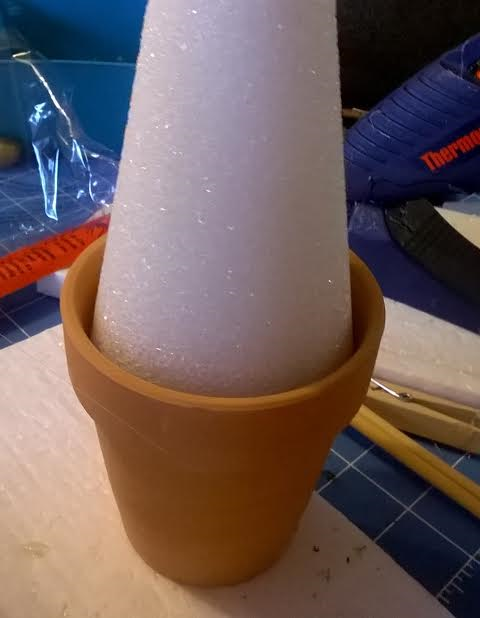
Start by placing your Styrofoam circles in the container.
I used 3 individual circles, stacked on top of each other.
You can cut them to fit the container if need be.

Center your tallest or largest succulent of choice, and poke it straight down.


(If it is too tall, you can trim the stem with craft scissors)


Some of the succulents come in pots, simply pull them out and wipe off the Styrofoam.


Arrange the plants around the center piece until you come up with a look you are happy with,
then insert each into the Styrofoam.


If they wiggle around, you can use a dot of E6000 or hot glue on the stem to secure.


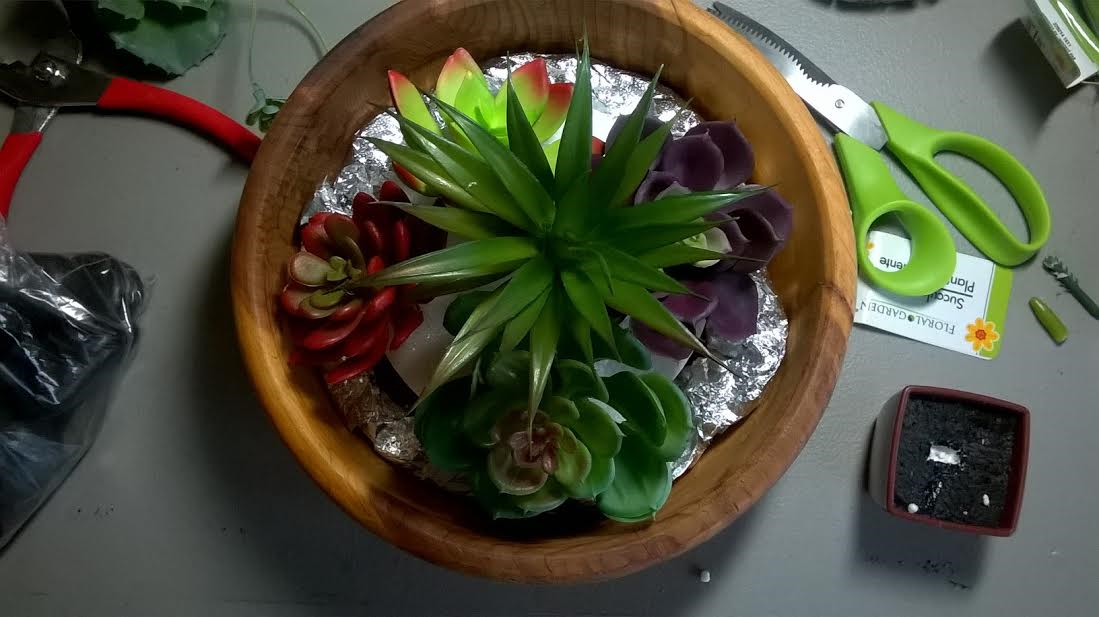
If you have excess space around the pot, you can crumple or roll Aluminum Foil as a filler.


Now fill in the top with rocks or gravel, place a few marbles for extra detail.
Your finished!


For this arrangement, I used an old strawberry pot that was sitting in our garage.
I used the same instructions as the wooden bowl,
except I used moss as a filler instead of rocks,
as the space was tighter.
I used small Styrofoam balls, cut in half for each opening on the side.
I hot glued the side succulent stems into the foam .

I hope you are able to find faux succulents in your area
and try this inexpensive, yet rich looking craft.

KEEP CALM AND KERRI ON!


Monday, February 27, 2017

$5 DIY ZINNIA MIRROR


ZINNIA MIRROR
$5 DIY
This mirror would make a great homemade gift for someone special!


Supplies available from the Dollar Tree:
1 foam core board
1-5" round mirror
3 bags of plastic spoons (each bag contains 48)
Other supplies:
hot glue gun and glue sticks
craft scissors
craft or box knife
2 pencils


Cut a slice off of the foam core about an inch wide.
Using a pencil punch holes about an inch apart (the last measuring 6" from the first)
(as shown above)
Using a pencil in the last hole, punch it into the foam core (this will be the center)
Hold this pencil still,
using a second pencil, insert into a hole and draw a line, pivoting around the center,
creating a circle. Do this is all the holes.
The outer circle will measure 6" radius, or 12" diameter.
Cut out the circle, using a craft or box knife.

I drew in lines from the center point out, for guidelines.
Cut out a small triangle about 1/2" away from the edge, for hanging.


Now comes the tedious part of breaking the spoon heads off of the handles.
I tried several ways to do this.
The best, for me, is to place the spoon on a table, with the spoon head hanging off the edge,
holding your hand on top of the handle, bend the spoon head down with the other palm,
this will snap it off.
Some spoons broke off crooked, but if it's not too bad, you can still use them.
If any of the handle is still attached, you can use craft scissors to trim them.


Now we will begin by gluing the first layer of spoons onto the back of the mirror.
Draw a line around the back of the mirror, about 1/4 " from the edge,
it doesn't need to be perfect. We will use this as a guide to glue the spoons.
Prop the mirror (wrong side up) on an upturned glass or plastic bowl.
Squirt a generous line of hot glue along the pencil line on the mirror, about 3" around.
Now place the cut edge of a spoon (facing down) on the hot glue line
holding in place for about 5 seconds.
Now continue with the next spoon, adding more of the hot glue line as needed.
You should get 14 to 15 spoon heads around the mirror, depending on how
close to the edge you glue them.
(As you are getting ready to glue on the last 3-4 spoons,
if it looks like you will be leaving a large gap, just leave slightly more room
between these spoons)


After the first row is finished, place a generous line of hot glue around the highest point
of the spoons on the back of the mirror....
turn over, and carefully "center" it on the foam core circle.


Now we will begin gluing each spoon onto the foam core, one row at a time.
Place a nice dot of hot glue on the back of a spoon head (as shown above)


...and place it "in between" two spoons from the first row, holding in place about 5 seconds.
The spoon will be at a slight angle.


Repeat with each spoon and each row.


After you are finished - it should look like the picture above.
It looks beautiful white, but if you would like to spray paint it another color:
Cover the mirror with foil, conforming to the mirror,
or you can use painter's tape.
Spray several light coats (following the manufacture's directions)
with a paint that is made for plastic.


This one is painted an aqua blue
but lavender, red, orange, yellow, pink, silver or gold
would be beautiful too.

FROM START TO FINISH,
THE ZINNIA MIRROR TOOK ABOUT 90 MINUTES TO COMPLETE.

VERY  FAST, EASY AND ONLY $5 TO MAKE!

Hope you enjoy this fun, decorative craft.

Keep Calm and Kerri On!


Monday, February 20, 2017

DIY Dollar Tree Easter Topiary

This is a VERY EASY Do-It-Yourself Easter Topiary

All but the Styrofoam cone was purchased at my local Dollar Tree:
2 bags of mini Easter eggs (comes in either plastic gold glitter-as above, or glitter Styrofoam)
1 bag of large Easter eggs on sticks (we just use one for this project)
a two pack of 3" terra cotta pots (using only one)
1 bag of Moss
1 roll of brown burlap ribbon
Total Dollar Tree Cost: $6

a two pack of 3" diameter Styrofoam cones was purchased from Walmart
(although sometimes Dollar Tree will carry these)
Total Walmart Cost: $4

Other Supplies, that I had on hand:
hot glue gun and glue sticks
scissors
chopsticks or a dull pencil (to keep your fingers from getting burned!)


Start by hot gluing your cone into the terra cotta pot.
(the cone measured just slightly smaller than 3", so it fit down "into" the pot)


I was so involved in crafting, I forgot to take pictures along the way - sorry!
Start by trimming the stick on the large egg to about 4 inches,
then insert it into the top of the cone, no need to glue.

Then carefully apply a hot glue dot to a small egg and hold in place for a few seconds,
starting at the bottom of the cone.
Continue attaching eggs, spacing 1/4" to 1/2" inch around the bottom,
then moving upwards until the whole cone is filled.
(if using more than one color of egg, be sure to mix the colors randomly on the cone)


To attach the moss, squirt some hot glue into a small space between a few of the eggs,
grab a small amount of moss, pulling it slightly apart, if dense,
and laying on top of the glue - CAREFUL not to burn your fingers!
Now use a chopstick or dull pencil to push the moss into the spaces between the eggs.
Continue around the cone until completely covered.
Be sure to double check the cone, I found a few spots that needed more moss.


I dressed up the rim of my pot with some burlap.
I buy a lot of these burlap ribbon rolls at the Dollar Tree (they are great quality!)
To make the ribbon the same size as the rim, I simply fold in the edges
and put a few hot glue drops every 2" or so. Be sure to use your chopstick to hold in place.


To attach, carefully hot glue with a few drops of hot glue around the rim,
and folding under, gluing the ends over each other.

I keep saying "careful, with the hot glue" because I am still recovering
from very bad hot glue burns from last week. No fun.

Then stand back and take a look at your handy work!
It only cost $10, and could be less, if you find the Styrofoam cones at your local Dollar Tree!

REMEMBER that you can make these with any color of eggs you choose, as well as ribbon,
or even pots, as well as painting the pots to change the color.


Hope you enjoyed this tutorial!
Happy Crafting!
Keep Calm and Kerri On!


Wednesday, February 15, 2017

DIY Easter Frame Decor


TRANSFORMING THREE FRAMES INTO EASTER DECOR


I wanted to create simple, vintage looking decorations for
my daughter-in-law and myself for Easter,
yet do so inexpensively.
I took a look around my house and found three wooden frames stashed away in a drawer
and thought they would make wonderful bases for door décor and a table topper.
I then went shopping at the Dollar Tree, which has lately had a great
supply of quality craft items, each of course, only $1.
At Hobby Lobby I found the perfect Robin's Egg Blue acrylic paint,
and I picked up a bird's nest, in case I didn't like my homemade version.
Here is how I made my Easter Frame décor:

Gather your supplies.
Items I had on hand:
frames
hot glue gun and sticks
Purchased from Hobby Lobby:
 Preformed nests (or you can make your own out of moss)
Acrylic Paint in a Robin's Egg blue
From the Dollar Tree:
A variety of mosses, in greens and browns
Spring Blooms
Burlap Ribbon
Butterflies
Burlap and silk birds
Specialty Store:
Green and Blue speckled eggs


Take out the backing as well as the glass from your frames and set aside.
Next, spray a primer on your frames and let dry.
Paint on your color of choice.
(stick thumb tacks into the back of the frames to give it a raised platform to paint easier)


After your frames are dry you can start arranging your nests, eggs, flowers and bows.
You can purchase nests at craft stores, yet I prefer to make my own from moss.
I have used one "preformed" on the larger rectangle frame,
and made the other two.


When gluing on items on the edges, its a good idea to double glue from the back
to make them more secure.


Be sure to stand back and take a look from a distance,
building up your creation. I added more flowers to the above frame.


I hot glued the burlap ribbons to the back of the frames.
Yet I prefer to hang them by fishing wire looped at the same distance as the bow,
to make it more secure.


The Butterfly Easter door décor, is open framed, using the nest purchased at Hobby Lobby.


The smaller frame, the handmade nest (from Dollar Tree moss) was glued
directly onto the glass. Beneath I cut out a dictionary page "robin".


For the square frame, I used dictionary pages again (Easter and spring),
as well as glued the Dollar Tree Hydrangea stem,
homemade nest, eggs and burlap bird (also from the Dollar Tree)
directly onto the glass. This time attaching a simple brown burlap loop
and fishing wire to the back with hot glue.


I hope you enjoyed these simple ideas on how to spend just a few dollars
to create your very own Easter décor.

God bless. Keep Calm and Kerri On!