Thursday, April 25, 2013

My Attempt at an Herbal Garden

My husband says "H"erbs with a hard H
I say Herbs with a silent H...
but how ever you say it...Herbs are great!
I love to cook with them and make tea.
They're great for medicinal purposes too.

When we purchased our house, this box container was already in the back yard.
The previous owners had tomato plants, garlic and onions planted in it.
That was three years ago.
I planted several herbs last year.
What survived are the following:
OREGANO
(I use this too freshen up store bought Spaghetti sauce and I use it in Meatloaf)
ROSEMARY
(We love Rosemary in just about every savory dish.  Its especially great in homemade Potato Soup)
and SAGE
(I like a little sage in my stew, as well as dried in poultry dishes - think Thanksgiving! 
But we really like to dry it in bundles and throw in the charcoal fire when we grill)
 
 
THEN....
I got ready to plant more herbs, so I worked up the soil,
and unbeknown to me
my husband had planted onion and garlic bulbs.
So here is a picture of my new BASIL plants and some onions coming up!
Basil is my all time FAVORITE herb!
I love it with fresh tomatoes, mozzarella cheese and drizzled with Extra Virgin Olive Oil!
I love it in grilled cheese sandwiches...in eggs...with cream cheese on crackers...
Yumm!
Then I started diggin' holes for:
CILANTRO
(We use Cilantro in our Mexican dishes and in salads and fresh salsas)
My husband makes his own beer and uses Coriander Seeds - which are the seeds from the Cilantro plant - who knew!)
and DILL
(We want to try canning this fall, so Dill will come in handy to make pickles.
It's also great in salads, dips, dressings and on fish)
I also planted a few MARIGOLDS
to keep the bad bugs away!
 
I made sure all of my herbs were labeled this year.
If you don't have labels, consider making some yourself like I did
using broken clay pots and even rocks.
I used a Sharpie pen to label them.
Well,
Wish me luck!  I hope the weather cooperates and the Herbs grow!
What herbs are you planting this year?
 
Keep Calm (planting your herb garden) and...
Kerri On!

Wednesday, April 24, 2013

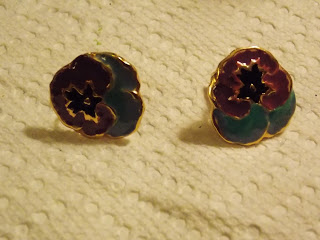
Don't Trash your Costume Jewelry, Update It!


I have some inexpensive clip earring of my mother's that I knew I would never wear...
So I updated them.  You can too!
 
 
Butterflies BEFORE
 
 Butterflies AFTER
 and....
 
Pansies BEFORE
Pansies AFTER
 HOW DO YOU DO IT? 
 
Dab on your  NAIL POLISH!
First, clean your jewelry by wiping it down with Rubbing Alcohol on a cotton ball.
Let it dry completely.
Then paint, or dab on selected colors of your nail polish.
I even dabbed on the torquoise and periwinkle together
 on a couple flower petals to give it dimension.
 
Let it dry.  Wah Lah!
Special thanks to my niece Megan for the idea!
Keep Calm and Kerri On! 


Wednesday, April 17, 2013

Can We Really Have Fruit Trees in our Little Back Yard?

YES YOU CAN!!!
We live in Northeast Oklahoma and have a very small, rocky back yard.
It's split into two levels, the back yard where our grass and flower gardens are...
and then it slopes down another 10 yards to a Native Plant area that leads to a neighborhood creek.
This is from the Lower Level.
A few summers ago, this is the west side of our back yard....
The rock stairs leading to the lower level...
This picture was taken "standing" in the east side of the yard....
Notice the old Apple Tree holding the hose.
The Spring of 2013 has taken a while to get here, in fact, possible freezing temperatures are expected tonight.  We planted our two trees within the last 2 weeks - unknowing of the future weather.
But that's what you get when you live in Oklahoma.
We checked with our local "Garden Man" and discovered we can grow apple trees in our area (hence the one that died a couple years ago shown in the picture)...but we may want to consider Semi-Dwarf Apple Trees, and TWO of them, so they can be cross pollinated.
Cross Pollination:

fertilization by transfer of pollen from the anthers of one flower to the stigma of another (by bees).

So, we purchased a Liberty Apple tree from Lowe's for $19.98...
and my husband read up on how to plant it, picked a spot on the west side of the backyard...
And filled it in....then we had to keep the dogs away from it....
They thought it needed a "pee" watering and a good chewing....
bad dogs!
Two weeks later...
It's blooming!
We found a Golden Delicious tree, which is a good pollinator for the Liberty.
We bought it last week, and Gary planted it...
on the east side of the back yard.
Low and behold, it's blooming!  Yay!
Now, we're praying for warm temperatures,
so not only our apple trees will grow,
but so will the GRASS and other plants.
I will be posting more pics of the apple trees as the spring and summer progress.
Keep Calm and Kerri On!


Sunday, April 14, 2013

Planting Petunias and Sweet Potato Vine

My mother was a great flower gardener.
She planted flower beds and pots all over our Kansas yard.
She could name all the species and varieties and tell you exactly how to care for them.
I now wish I would've paid attention to her when she tried to teach me.
I just wasn't interested, and thought I never would be.
Now, she's gone...and I'll never have that opportunity again,
at least directly from her.
So now, I have decided to learn as much as I can, in honor of her,
and pass the info along.  My first step was to join a local Garden Club...
the second step, was to search the Internet.
 
Here is the picture I found on the Internet that I just loved!
They are Petunias and Sweet Potato Vines.
So I did some research to find out "if", "where" and "how" I should grow it.
PETUNIAS are an annual (meaning all roots, stems and leaves of the plant die annually)
Petunias do well in full sun, or some shade.
To keep the plant blooming throughout the summer, you should "deadhead" - or "pull off" the dead blossoms.  Petunias can also become gangly, meaning long and stringy, to avoid this, pinch or cut off the top 1/3 of the plants during the summer, to encourage new growth, shoots and blooms.
OK - I think I can do that!
 
SWEET POTATO VINES - I grew one of these in a pot last year, not knowing what it was, or how to grow it (silly me didn't read labels and tags).  But to my surprise - it grew beautifully and was so pretty!  I love the lime green color (it also comes in deep purple and deep green) and it spills out from the pot...very easy to grow.
So Sweet Potato Vines actually do grow sweet potatoes!  I wish i would've known that, as I left the dying plant in the pot and didn't dump it until this spring...finding a few shriveled up sweet potatoes!
It likes full sun, or a little bit of shade, so it's perfect to pair with the petunias! 
So, now it was time to pick my "spot" for the Petunias and Sweet Potato Vine.
I have a full sun garden spot right outside my door, we face South, and it gets a great deal of afternoon sun.
My husband helped me loosen up the soil and add in some Miracle Grow Potting Mix.
I started planting in March (2013) and the Sweet Potato Vines weren't out yet.
But I am NOT a patient person, so I started planting anyway.
I laid out a pattern with my petunias, and used the plastic containers
to mark the spot where I wanted the Sweet Potato Vines to go.
I chose purplish pink petunias to go with the lime green of the vines.
I also chose a Axcent Deep Purple Rock Cress that is also full sun,
just because it was pretty, and I couldn't resist!
When I was happy with the placement of everything, I planted them.
Then low and behold, when the Sweet Potato Vines came out for sale at our local greenhouse, I found even more petunias in a darker purplish pink and bought them as well.
So last night, as the sun was going down, I planted the rest of the bed.
It's not spaced perfectly, but it looks pretty good I think.
Now, as the summer progresses, with lots of water and plenty of sun, as well as deadheading and pinching, I should have a beautiful garden bed full of Petunias and Sweet Potato Vine!
My kitty cat Maizy Daisy (now 18 years old) enjoys the garden too!
Here's a look at the whole front door garden area.
Look at my previous post on how we did the rock garden!
I'll share more pictures and updates as the summer moves on!
 
Thank you for reading!
Let me know what kind of flowers you plant this Spring!
Keep Calm and Kerri On!


Friday, April 12, 2013

Zentangle your April Ipsy Bag!

Is your April Ipsy Bag a little too bland for you?
Do you love to doodle?
Grab some Sharpies and zentangle your bag!
 
Here's my finished bag....you can do it too!
I love the April Bag but heard some people say it was "too plain" for them.
So I thought I would show you a way to make it a piece of artwork...
a zentangle!
What is a zentangle?  A structured, contained doodle.  The word Zentangle was coined by Rick Roberts and Maria Thomas.  Google it to see more examples, try "zendoodle" as well.
I chose to "zentangle" on just one side of my Ipsy bag.
I used the "fine tip" Sharpie - the larger of the two Sharpies I had on hand.
I just began drawing (moving my whole arm, not just the hand) to get smooth curves and spirals.
The sharpies will bleed a little - don't worry - just don't let the sharpie "sit" on the bag in one space for too long (otherwise it will result in big blots).
There is NO right or wrong way to draw your designs...this is YOUR zentangle - so have fun with it!
Then I began drawing patterns "inside" the enclosed shapes.
I am a gardener - so mine has lots of flowers and leaves.
Others are just random patterns, repeated.
I love to balance out the positive (the black ink) with the negative (the white space)
So I filled in a lot of the shapes with the markers.
I had a hard time "stopping"!  It was soooo much fun!
I hope you try decorating your Ipsy bag...
Remember to Keep Calm and Kerri On!


Wednesday, April 10, 2013

Ipsy Glam Bag April 2013

My April Ipsy "Glam Bag" is here!
"Be a Bombshell Blush"
in the color:  Sweet Cheeks
Full Sized!!!
Retail price:  $16.00
(different colors in other Ipsy Bags)
This blush is very pigmented, slightly pearl.  This color called "Sweet Cheeks" is a soft pink.
"Two Cosmetics" Duo Eyeshadow
in Heartache
(each April Ipsy bag comes with either
 a "Two" Eyeshadow, or a Mica Beauty Eyeshadow)
Full Sized!!!
Retail price: $6.99
("Two Cosmetics" is a makeup with a cause;
 you buy one, they give one to charity)
This duo has a soft pink for lids and brow bone and slightly deeper mauve for the crease.
"Sation" Nail Lacquer
in the color:  Love at First Byte
Full Sized!!!
Retail Price:  $3.50
I painted my nails with three coats of the nail polish...it is very sheer.
(different colors in other Ipsy bags)
This color isn't one I'd choose for myself, normally, but its alright for a nude shade...very sheer. I like the brush, its very wide and the polish flows on smoothly.
"Healthy Sexy Hair"
Soy Renewal with Argan Oil
(a nourishing styling treatment)
Sample Size: .85 fl. oz.
(each April Ipsy bag either comes with this sample,
 or a "Big Sexy Hair" volumizing powder)
Estimated Sample Price:  $2.00
This "Healthy Sexy Hair" formula is an oil, in a clear gold color...a little goes a long way.  Just a slight fragrance...use on wet hair to speed up dry time, or on dry hair to reduce frizz.
I really like the fact it has Argan Oil!
And don't forget the cute bag this month!
A white canvas bag, with a bright pink zipper.
Inside is a pink and white striped liner with the "Ipsy" logo.
Here's a picture of the bag and it's contents again!
I am sooooo pleased with this month's bag.
Great job Ipsy!
Total estimated value of this bag:  $28.50
(not including the white canvas makeup bag)
...and REMEMBER...Ipsy is only $10 per month (no extra shipping fee)
just go to:
 
Keep Calm and Kerri On!

Monday, April 8, 2013

DIY Tea Cup Bird Feeder

 Golden Finch love "tea time" at our house!
Make a simple, but elegant bird feeder for your feathered friends
 from a tea cup and saucer.
This tea cup and saucer were from my mother's collection.
They were not part of a set, and I wanted to do something creative with them.
So I took a moment to reminisce...
My mother lived with me for a few months towards the end of her life...
and she loved sitting by the window in the mornings and watching the birds.
What better way to put her tea cup to use, than to make a bird feeder!
Here are the instructions:
Wash and dry your tea cup and saucer.
Wipe down the outside with a little Rubbing Alcohol (to get any film off)
Using E6000 adhesive (I love this stuff!)
attach the cup (on it's side) to the saucer.
This way, the seed "spills" out onto the saucer.
*Make sure the handle of the saucer is sticking upright.
I had to prop mine in place and leave a note so nobody touched it.
Let it dry for 24 hours.
 
Fill with seed and hang!
 Ours is next to "Stephen" the flamingo!
I used a plant hanger purchased at a yard sale -
 but you can find them at garden stores and retailers for around $7.
This particular cup handle was too narrow for the hook to go through...
so I simply added some twine to hang it from the hook.
I bet my mother is smiling down watching the birds have tea time!
Keep Calm and Kerri On!