Create customized "Post-it-Note" Magnetic Booklets and Notebooks
for Valentine's Day!
Easy and Inexpensive

MAGNETIC POST-IT-NOTES BOOKLET
Supplies:
card stock in your choice in colors
decorative papers
stickers, buttons, do-dads (optional)
paper cutter or ruler & pencil
scissors
glue stick - like Elmer's
adhesive magnetic tape roll (1" wide)
1 Post-it-Notes booklet (I used 3"x3") or box of 5 booklets
a scoring tool, like a dull letter opener or toothpick
Cut a piece of card stock to 3" x 7-3/4"
Measure and score at the following intervals (this will allow you to fold the card stock evenly around the Post-it-Notes booklets.
2-3//4" - score across
space down 1/4" - score
space down 3" - score
space down 1/4" - score
This will leave 1-1/4" at the bottom
Now fold the card stock to wrap around the Post-it-Note booklet
Cut another piece of card stock (I used a different color) 3" square.
Glue this to the 3" square to the inside square of the card stock formed by the folds.
Glue the card stock down (see upper right picture (this will give the booklet extra support).
Use the glue stick to coat the bottom of the Post-its and stick to the top of the 3" square.
PHOTO: (outside of book showing the overhang of paper to be folded over the edge)
For the cover you will need to attach a piece of paper (not card stock) 3" x 2-1/2". Glue the edge of the paper to 1/4" of the edge of cover....leaving the rest to overhang (this will fold over to cover the magnet). See the picture below....
PHOTO: (inside of book-getting ready to glue paper over the magnet on the left side)
Cut two pieces of magnetic tape 2-3/4" long.
Peel off the adhesive paper and press the magnet onto the inside cover of the front edge.
Fold over the paper and glue over the magnet, pressing around the sides of the magnet.
(card stock is too thick for the magnets to work, only use paper to cover the magnets)
Attach the magnet to the other side, making sure it is properly placed, it's easiest to lay the other magnet (with adhesive facing out) on top of the paper covered one, the magnets will automatically attract and hang on to each other....fold book together and press. This will adhere the magnet to the other side. This is hard to explain, but try it....it works.
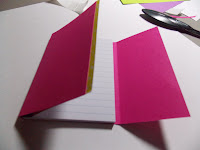
PHOTO: (inside of book: left side magnet is covered w/paper; the right side is folded over showing where the magnet is to be placed, then covered with paper)
PHOTO: (inside cover of another booklet, after the right magnet is covered with paper)
Cut another piece of coordinating paper 3" x 2-1/2" and glue over the back magnet, folding around the edge of the back cover.
PHOTO: (Remember to always press firmly and make sure the glue is spread out to the edges.)
Continue decorating the top cover with coordinating paper, stickers, buttons, etc...
The book should stay closed, the magnets connecting it.
Great job! Very "professional" looking!
PHOTO: Attached buttons with a glue gun....I like it!
Now you're done! Wasn't that easy! And so cute!
MAGNETIC LITTLE NOTEBOOK
Take measurements of your notebook. Mine was 3-1/4" x 4-1/2".
Cut your card stock long enough to wrap around the notebook, and excess to connect the magnets.
I cut my sheet of card stock 4-1/2" x 9".
Measure where the folds will be and score.
ONLY glue the card stock cover edge (first 1") to the front cover of the notebook.
DO NOT glue the back to the card stock.
(The photo above is an "aerial view" of the notebook standing on it's edge).
The magnets will be on the inside front cover edge, and the "fold over".
Again, the best way to do this, is attach the magnets together, adhesive sides out...
peel off one adhesive paper and attach to the inside cover. Fold over the back edge,
take off the other adhesive paper and "close" the book, pressing to adhere the magnets.
Now decorate! Pretty, pretty!
* YOU CAN HIDE THE MAGNETS BY GLUEING PAPER OVER THEM AND WRAP AROUND THE EDGES.
Great job! You did it!
Keep Calm and Kerri On!


I LOVE mine! It is on my desk and is so much cuter to look at than just a pad of post its. (Or even more so my list "system" which is just to grab the closest piece of paper and scribble down my thoughts. So much more organized now! Thank you!
ReplyDelete