Thursday, January 31, 2013

DIY Magnetic Board for Your Cosmetics

Very simple!  Make your own Magnetic Board to hold your cosmetics.
I don't have a lot of cosmetics, but I have enough that it's hard to keep them organized.
What better way to keep them visible and at hand than to create a Magnetized Board.
This is an inexpensive, fairly easy craft.
 
Before
This is what my vanity looked like before...not too bad, but not too good, either. 
 
 After
The board gets just enough of my clutter up and out of the way...plus there's room to spare if I decide to add more items as my makeup collection grows.
 
 INSTRUCTIONS
SUPPLIES:
frame
scissors
tin shears or heavy duty scissors
metal sheet
work gloves
permanent marker
spray adhesive
decorative papers
assorted magnets
your cosmetics
First of all, pick out a frame.  I happened to have a picture frame with broken glass.  I decided to use it because it was the perfect size.  I wanted something small to hang just below my bedroom window where I have my vanity table.  My frame measures 10"x22".
Remove the glass and paper inserts, you will not need them.
Purchase a metal sheet, either at a hardware or craft store. (I found one at Hobby Lobby for $11)
Now, use the back board that was in the frame to trace the measurement onto the metal with a permanent marker, a pencil did not transfer.
Cutting the metal sheet was the only hard part.  I found out I'm a bit of a wimp when it came to working the shears.  The metal is thick and sharp....wear gloves!  If my husband was home, I would have batted my eyelashes and baked him some cookies, so he'd cut it for me, but I didn't want to wait that long, he was at work.  So I used what little muscles I have and I gotter done.  Just call me Rosie!
After the sheet is cut to size, spray it with adhesive (in well ventilated area) and place glue side down onto the back of the paper.  It is easiest to have the paper flat on the table and position the metal on top, than the other way around, avoiding bubbles or creases.
Trim the paper around the metal sheet. 
Pop the paper covered metal and backboard into the frame and secure.
                          To hang,  I used Command Picture Hanging Strips...two on each side. 
 This is my favorite way to hang pictures - they don't damage the walls.
This is a close-up of the paper I chose. There are so many different looks to be achieved, simply by the paper you choose.  Pick something that really speaks to you...a bold print, simple stripe, chevron patterns, paisley....it's all up to you.  After I glued the paper and metal together, I had to test it with a button magnet - Yep! It works!
Time to glue the magnets onto the back of your cosmetics.
This is a great time to sort through your stuff and get rid of any old makeup and clean the containers.
Be sure to peel off any stickers on the bottom to ensure a secure adhesion to the magnets.
I used magnetic tape, cut to size for larger items.
Trial and error:  if a makeup container has an indention on the bottom, magnetic tape won't work.
Use button magnets for these.  Self adhesive ones are fine or use a dot of E-6000 to attach.
Let the glue dry completely before placing on the board.
I even attached a magnet to a metal tube container and use it to hold some brushes.
You are ready to place your cosmetics on the board - anyway you want! 
Hang the board in a convenient place.
It's soooo pretty. Just look what you created! Not only is it useful, but it's wall makeup ART!
I was on a roll, so I changed out my brush and lip color containers. 
 
 I purchased simple square glasses (Hobby Lobby $3.29 each)
and filled them 2/3 full with whole coffee beans (smells great!)
I used one for my brushes and the other for lip stains and glosses.

I keep a square plate handy for my oils and moisturizers as well as a little blue jar with my little perfume samples. I upcycled a wooden jewelry box that my sister Lindy gave me to hold  more cosmetics and it has a nice sized mirror on the inside lid.  I keep a bright lamp on the table as well.  We need great lighting when making ourselves beautiful!
I hope you enjoyed this tutorial.
Keep Calm and Kerri On! 


Tuesday, January 29, 2013

DECORATING YOUR HOME and LOVING IT

Your home.  It is your castle, your safe haven, the one place you can be yourself. 
Does your home reflect  you and your idea of a sanctuary?  Are you having difficulty making decisions when it comes to decorating?
 
Below, I will share my tips for making this process as painless as possible.   
 
First, let me tell you, I struggled too, and I found a lot of my answers several years ago in the book,"Simple Abundance" by Sarah Ban Breathnach.  This book helps with  much more than  decorating skills.  It  shows how your daily life can be an expression of your authentic self.  It is a day-by-day guide.  I have given it to several of my closest girl friends. Even though this book is several years old, it is still very relevant today.  I highly recommend it.
 
 As for this post, I will just be focusing on how to DECORATE YOUR HOME and LOVE IT.
 
 Some commonly asked questions and my suggestions:
 
1.  How do I make my home inviting to others, if I have a lot of stuff? 
Use items that you love to decorate your home.  Remember to keep it simple.
Just because you own it doesn't mean you have to display it or keep it. 
Keep only the items you LOVE, or if they fill a necessity.
Down Size (at least visually, if not literally).  If you have a lot of stuff that you love, keep most of it BOXED away (out of sight) and "cycle" displays of your favorite items according to season. Anything you don't love or need, consider donating, selling it at a yard sale, or throwing it away.
Nothing looks messier than a cluttered house.
 
Even hand-me-downs can look nice if kept uncluttered and tidy.
Keep counters cleaned off and choose a simple bowl of fruit or favorite item to make a statement.
If buying a high ticket item like furniture go with a solid color unless you absolutely LOVE the pattern and can live with it for years to come.
Group pictures on the wall with a similar theme, matte color or frame colors.  One picture on a wall looks lonely, especially if it's too small for the wall space. 
 2. What if I don't know what my style is?  There's so much to choose from.
Ever visit some body's home and wish it was your own?  Then go into a furniture store and see a "put together" room you love just as much? Look through a magazine and find a picture that has the most georgeous thing and you want to rip out the page and keep it? (do it by the way!)  Don't be overwhelmed.  It can take a little while to discover your own style.
If that is you, believe it or not, you are half way there.  You are attracted to certain items.  That's good!  Go through some magazines and rip out those pages that appeal to you.  Keep them in a folder or book (you will also find this suggested in the "Simple Abundance" book above). Before you know it, you will have a visual collection of items that appeal to you.  You begin to uncover your inner style.  Your subconsciense knows what you like, even if you think you don't!
Now, go window shopping.  Go look at the department stores and take your camera phone, snap pictures of items you like.
3.  What if I don't have a lot of money to spend?
Try checking out your local Goodwill; second hand shops and garage sales.  As they say "One man's trash is another man's treasure."
Only spend money on items you LOVE.  Don't worry what others will think of your purchase.  This is YOUR home.  You want it to reflect you...and you have GREAT taste!
If you don't have ANY money to spend, set aside a little at a time, make it a treat to finally go out and spend your hard earned money. In the mean time, remember less is more, it's OK to not have much.  We're in the day and age of "we want it now" but sometimes that results in bad purchases.  Take your time.  Build your collection of loved items through out the years.
4. I have some collections and I want to display them.  What is the best way to do this?
Make a statement. Group items together.  
Do you have a rock collection? Stack or place them on a table or in a bowl. 
Have a grouping of plates from Aunt Ruth?  Hang them in a wall grouping instead of pictures. Collect ceramic pigs?  Show them off on a pretty shelf. 
Love coffee?  Create a special coffee bar  (see my earlier post).
Did you inherit dishes from an ancestor?  Display them in a cabinet or on a shelf.
Any grouping of similar items looks better together than apart. 
 
ITEMS TO MAKE YOUR HOME COMFORTABLE:
Pillows
Throws
Vase of Flowers
Plants
Lamps (table, floor and uplighting) & Shades
Bowl of Fruit
Draperies
Fragrance (candles, fragrance outlets, oil diffusers, etc.)
(all of the above items can be changed for each season, spice up with different patterns, textures, fragrances, fruits and flowers)
 
5.  What if my spouse, partner or roommate's taste differs than mine?
Don't worry.  Most people can find a compromise when it comes to decor.  But if you simply have to agree to disagree, try designating certain rooms or areas for each personWho's the cook?  Maybe that person can be the decision maker on dishes and kitchen items.  Who spends the most time in the living room? etc...
Or, you can always go for the "eclectic" style - a mix of two or more styles....try it out, it just might work.  After all, this is your space together.  There is a reason the two (or more) of you are sharing the same living space.  Most likely your styles will make a great collage.
Just remember..... keep it simple and UNCLUTTERED.
6. What about my bedroom?
Best advice I can give here is: Keep the bedroom simple, it should be a place to relax....not study, or watching television. One of the best things I did to get a better night sleep, was to remove the television from my bedroom.
Balance the bed with side tables.  Choose matching or similar tables on either side with lamps. 
There's nothing more appealing (or romantic) than to have a made up bed with comfy clean sheets, blankets, comforters and pillows. 
Keeping clutter to a minimum is a must for peaceful sleep, your eyes may be closed, but your mind knows it's there - so pick it up.

Last of all, don't forget your outside curb appeal.  It is the first impression people get of your home.  Keep your lawn nice.  Live in an apartment building?  Pick up around the hallway or walk leading to your door.  Decorate the door and doorstep with seasonal wreaths, plants or other decor.  
  
  We welcome visitors with a Swedish Dala Horse from Lindsborg, KS...close to my hometown. When they approach our house it states our last name (so they know they're at the right house!) and when leaving, it says "Come Again" in Swedish.
 
Hope this helps.  Please feel free to leave comments or ask questions.
Thank you! ~ Kerri
Keep Calm and Kerri On


BEER BREAD (Quick Bread)

 
Super, Duper Easy! Buttery, crispy crust; soft, dense, flavorful center...
Yummmmm.....!

3 cups Flour
3 teaspoons Baking Powder 
1 teaspoon Salt
1/4 cup Sugar
1 (12 ounce) can of your favorite brand of Beer 
1/4 cup Butter
(another can of beer, if you want to drink while you bake!)
  • Preheat oven to 375 degrees.

  • In a large bowl, combine dry ingredients.
    Pour in one can of beer - room temperature if possible. Watch it foam!
    Stir until just combined.
    Pour into greased bread pan or stone.
    Pour melted butter over the bread dough before baking.
    Bake for 1 hour.


     Let rest 15 minutes before taking out of pan.
     
    Slice (a bread knife works best) and enjoy!
    The alcohol bakes out of the bread but leaves the delicious flavor behind.
    From my kitchen to yours,
    Keep Calm and Kerri on!  ~ Kerri

    Sunday, January 27, 2013

    Glade Expressions Product Review


    Hey, I love to do product reviews and today I am doing one on Glade Expressions Fragrance Mist and Glade Expressions Oil Dissuser.  But first of all let me tell you how I got one of each of these starter kits for absolutely free!  I am a Bzz Agent
     
     This is the description BzzAgent has on the website:  Connecting people and their favorite brands since 2001, BzzAgent is the leading social marketing company. What's that mean to you? We put products in the hands of hundreds of thousands of real consumers and help them share their opinions about them with friends and family via reviews, facebook posts, photos and videos, blog posts and more. 
     
    I completed some easy surveys and was chosen for the Glade Expressions Campaign through BzzAgent.  Which simply means I get to try their products for free and share my true and honest opinions with you.  They want "true" opinions, so that's what I'll give.  I also get to share coupons with my friends.  If you are friends with me on Facebook, I have coupon links for the Glade Expressions so you can try them too.
    
    So, I chose the fragrance "Pineapple Mangosteen" Oil Diffuser.
    I'm not usually a tropical fragrance person, but thought I should try something outside of my box.  I'm glad I did.  I really like it.  Above is a picture of my Oil Diffuser on my little table by our big picture window.  I have a "zen" theme going on right now - hence the gong, rocks and birds.  I chose the wooden diffuser, but there was a white one at Wal-mart as well.
    This is a picture of my white Fragrance Mist in my bathroom.  I also chose it in the scent of "Pineapple Mangosteen"
    Each of these products is a "starter kit" meaning the wooden diffuser and the white canister are refillable.  I love this idea.  That way I can try the other scents offered:  Fuji Apple & Cardamom Spice; Cotton & Italian Mandarin; and Lavender & Juniper Berry.
     
     
    MY GLADE EXPRESSIONS REVIEW RESULTS
    (In my home)
     
    My husband, two sons and I all agree the products are attractive and easy to use and we all like the fact that they are refillable. Well, my husband and I are happy about that, not sure my 22 year old and 12 year old really care.  I love the pineapple and mangosteen fragrance.  When I first plugged in the diffuser my husband stated that it was way too strong.  This was in a large room and he was sitting right next to it.  Within a few hours it didn't seem to bother him anymore.  It scented the whole room to where if  I'm outside and come in, I can smell the fragrance and it is very inviting.  My 22 year old son doesn't really care for the tropical fruity smell.  My 12 year old son says it smells like a tropical smoothy - so I know that's good.  My husband says its nice.  So overall, we like the product idea, but only 3 out of 4 like this particular fragrance. 
     
    Now to wait and see what my friends say.  So try one out with my coupon on facebook or if you can't get me on facebook, let me know and I can mail you one of the coupons BzzAgent gave me (while my supply lasts)  Thank you!
    Keep Calm and Kerri On!


    Saturday, January 26, 2013

    CHOCOLATE CHIP PUDDING COOKIES

    Hungry for some warm chocolate chip cookies?
    Forget those pre-made cookie tubes. Make your own cookie dough in NO time at all.  When you start with a great recipe, you just can't go wrong!
     
     
    CHOCOLATE CHIP PUDDING COOKIES
    My husband describes these as:  "Soft, melt-in-your-mouth cookies".
    They are a staple at our house.  The pudding mix gives them extra flavor and texture.  I've never had a batch go wrong. Great for gifts, bake sales and kids' school activities.  Just whip up a batch and you'll hear compliments thrown your way and everybody asking for the recipe. 
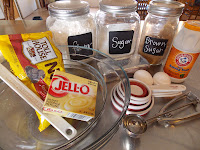
    Gather your ingredients:
    2 1/4 c. all purpose flour (I use unbleached)
    1 tsp. baking soda
    1 c. Butter Flavored Crisco
    1/4 c. sugar
    3/4 c. brown sugar (packed)
    1 pkg. (sm.) instant vanilla pudding mix
    2 eggs
    1 (12 oz.) pkg. chocolate chips
    *Preheat oven to 375 degrees.
    Yep-that's me in my "Wonder Woman" apron, mixing the cookie dough!
    In a medium size bowl combine flour and baking soda.  Set aside.
    In a large bowl, combine sugars and instant pudding.  Mix in the butter flavored Crisco (you can use butter, but I like the texture the Crisco bakes into the cookies).  Then beat in eggs.
    Stir the dry ingredients into the moist.  When almost completely combined, stir in the chocolate chips.  Scoop the cookie dough (by tablespoon or scooper) onto baking stone or sheet.
    Bake 10 - 12 minutes until light golden brown. 
    Let rest on baking stone for 5 minutes before placing on a cooling rack.

                                                       
    now.....ENJOY!
    Keep Calm and Kerri On!  ~ Kerri